Testing Cambium Terragraph hardware

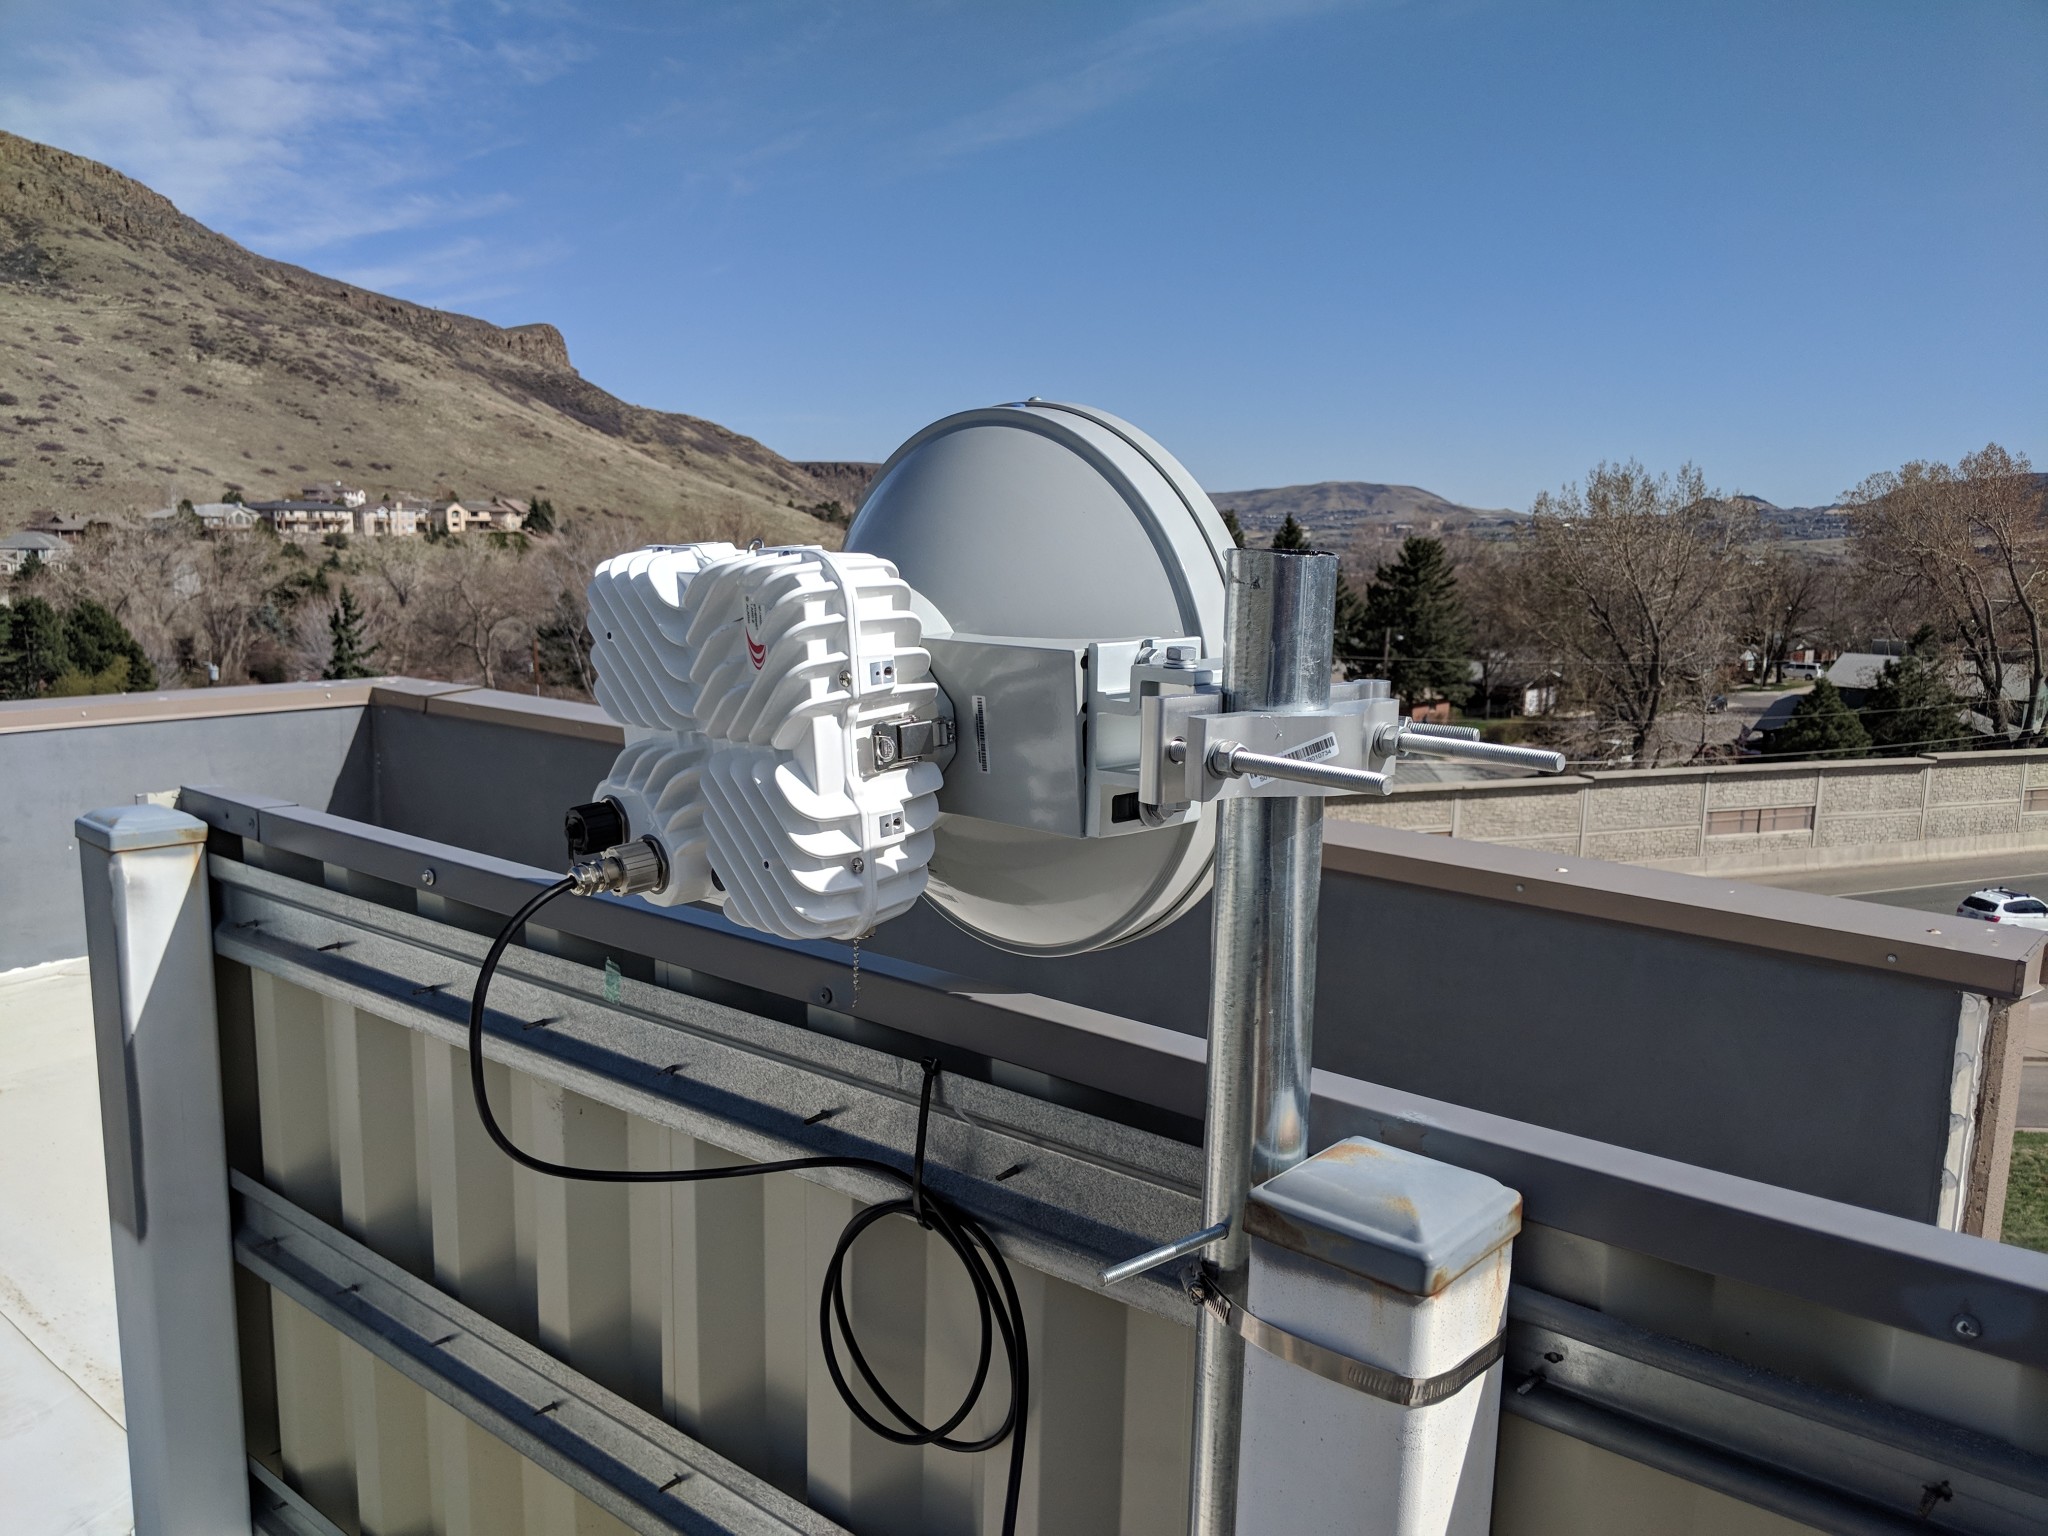
Cambium V3000 client node on an apartment building roof

After a couple months of testing Siklu’s Terragraph hardware (see related article), we were approached by Cambium asking to run a side by side test using their solution. We have had a long working relationship with Cambium on their ePMP product line so despite running into some “testing fatigue”, we agreed to try out the V5000 distribution node and the V3000 client nodes on a site in our downtown area.

The chosen test site is:

  • V5000 connected via 10 Gbps fiber to a core switch and powered by 48 VDC. Site is connected to 10 Gbps fiber

  • Five V3000 client nodes all within 300 meters servicing a large apartment building full of college students, a food hall with free WiFi, a couple condo buildings and the city Visitors Center.

All sites are fairly heavy users, especially the apartment building with the college students. These sites were currently being connected via 4 different 60 GHz APs all at the same location as the proposed V5000 install. We had a mix of Mikrotik and Kwikbit 802.11ad products. Much like our other test site with Siklu, we were seeing our own self interference at this location due to the amount of 802.11ad radios (three others are also on this same roof but not part of this test).

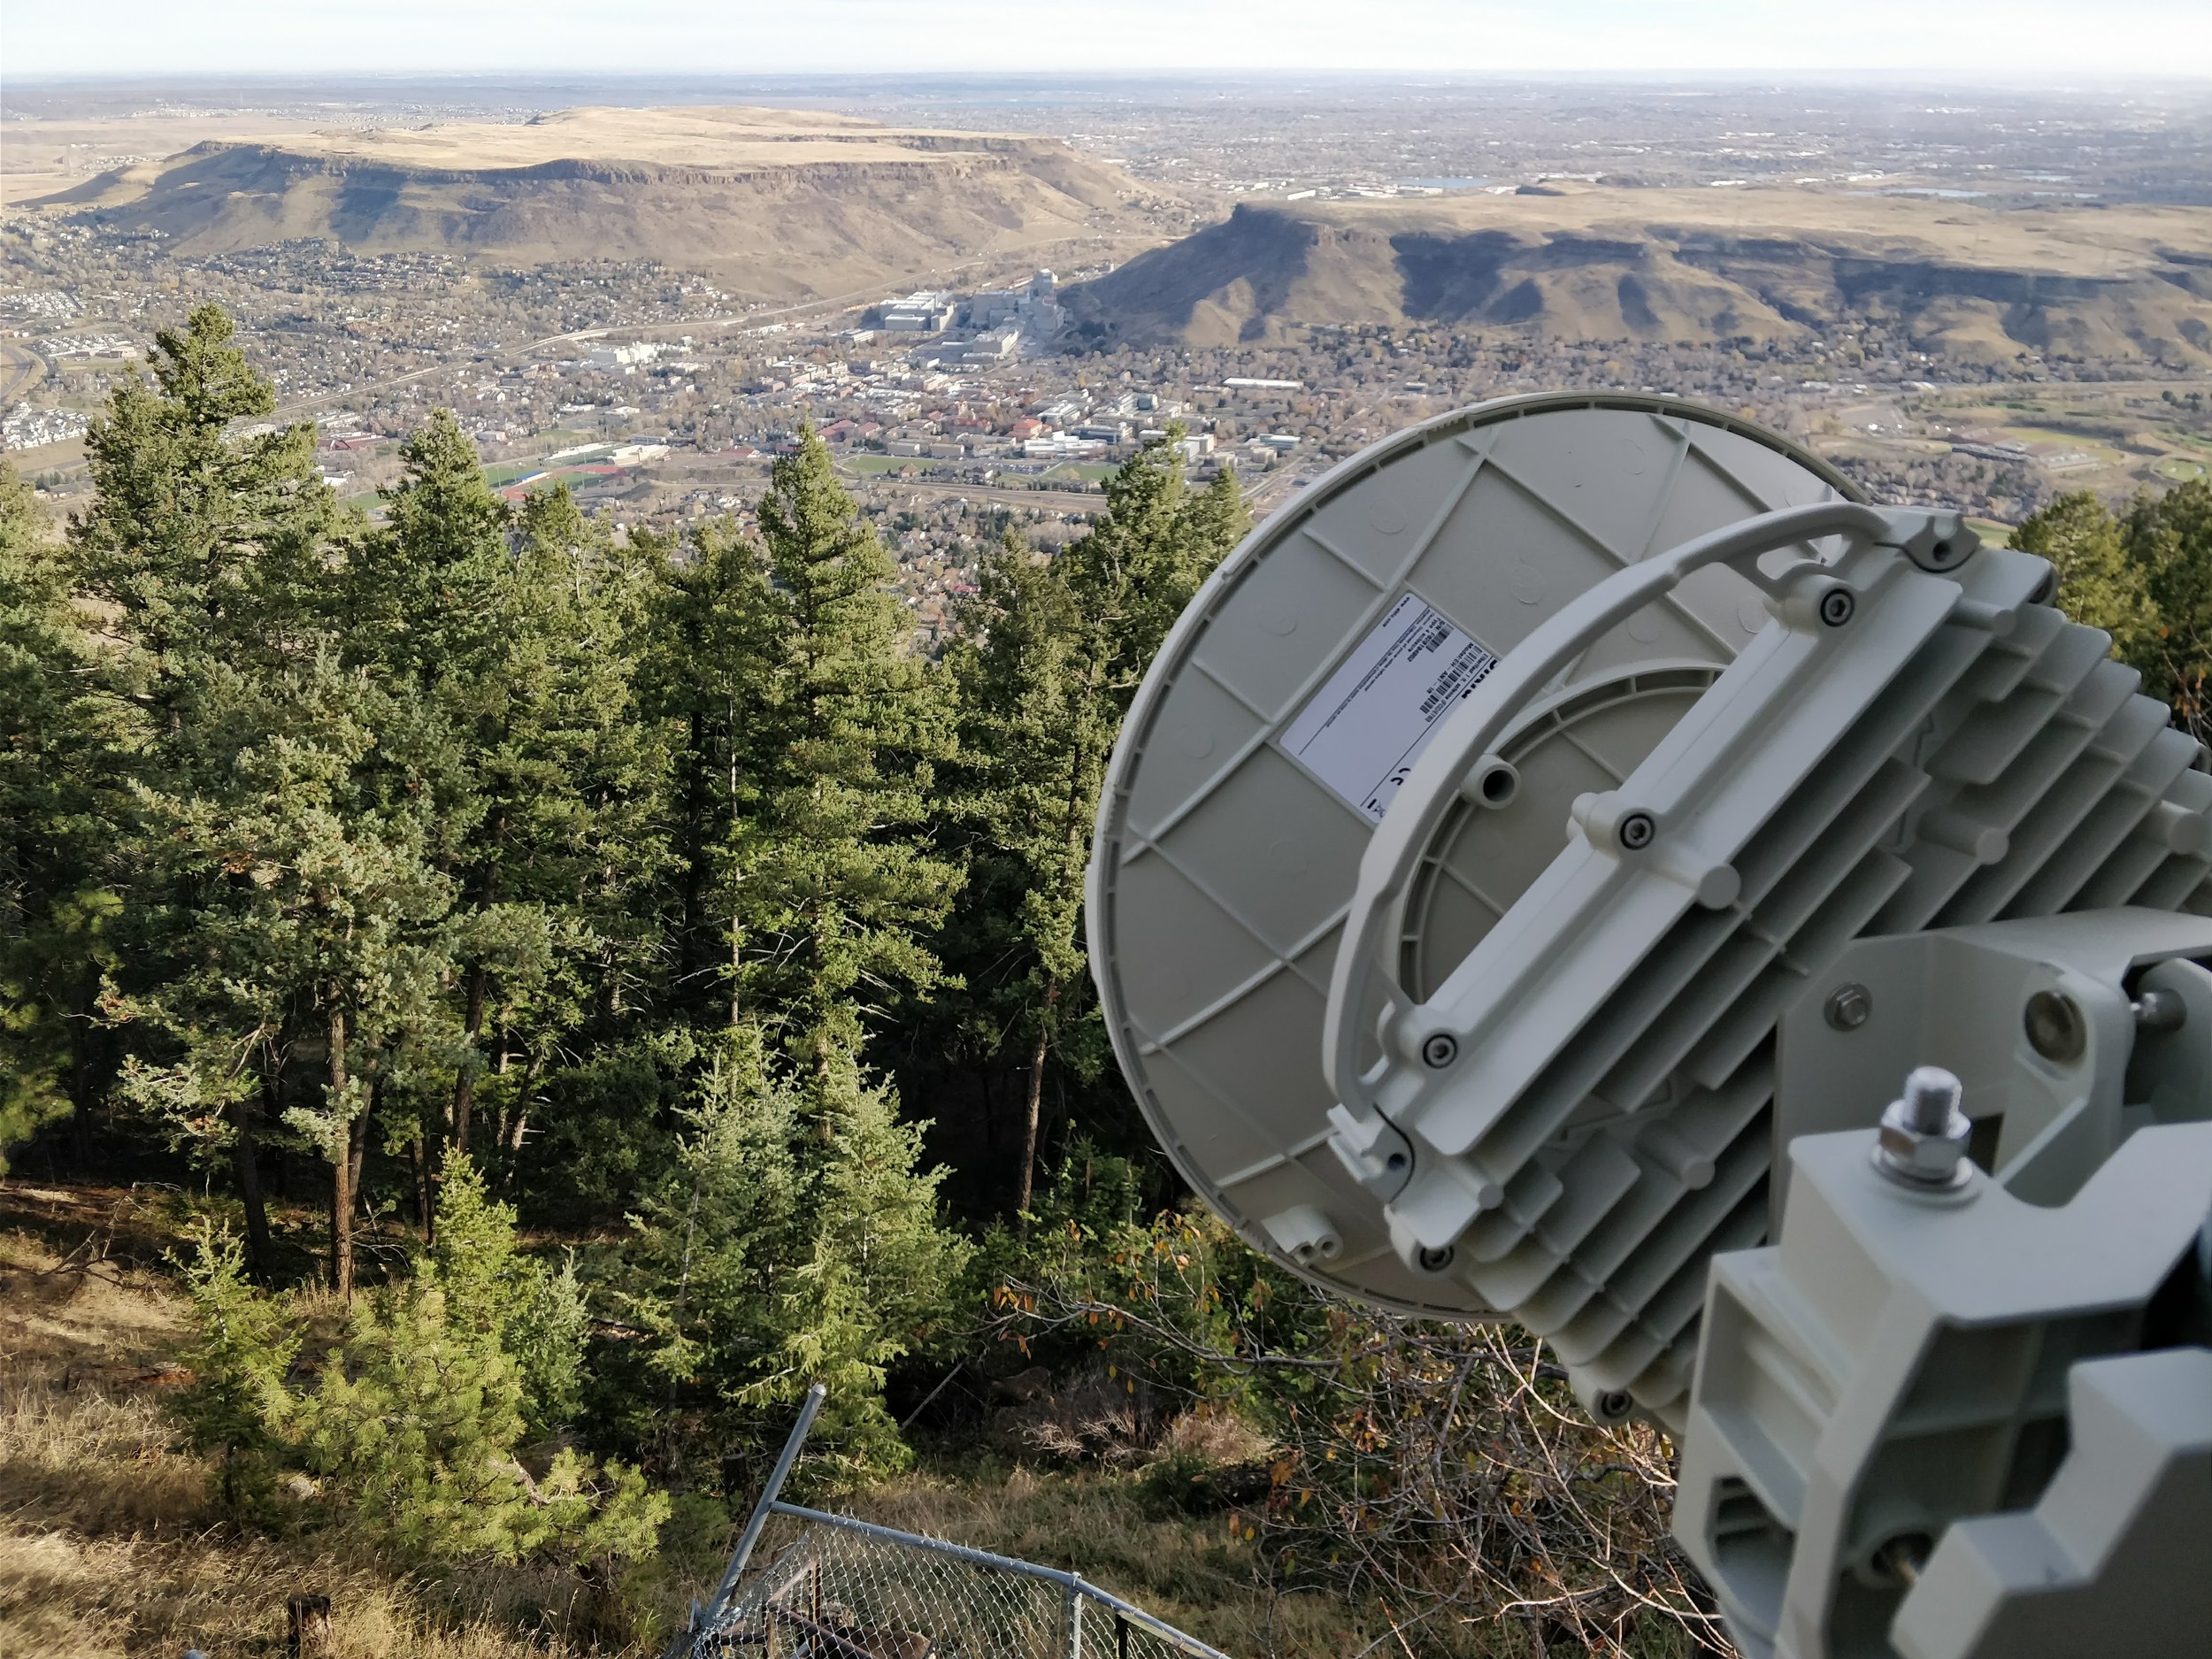
V3000 client node on a condo building roof

The Cambium Terragraph solution requires an E2E controller that handles the back end work of connecting the links, sending configurations, upgrading firmware, etc. This is tied into Cambium’s cnMaestro solution. There are two options for this controller:

  1. Run it on the V5000 distribution node

  2. Run it as a container on an on-premise box

If you use the onboard E2E controller on a radio, you can use the web interface of that radio to control everything. Or, in either case, you can attach this to your cnMaestro instance and manage it though that site. We run cnMaestro as an on-premise server on our Proxmox box. You can also run the cloud hosted version of cnMaestro.

We initially spun up the E2E container on a Ubuntu instance on our Proxmox. This was then connected to the cnMeastro on-premise server. Once we started working with Cambium tech support on the initial configuration, they suggested we use the onboard controller on the V5000 radio. This was partially related to the fact that the radios must see this E2E controller to get programming. We were programming these radios off-line in the shop and they did not have layer 2 connectivity back to the E2E controller we set-up.

Cambium has provided a list of videos that help with the deployment of your first link. We had a call with Cambium engineers to help get our link operational - but it is not difficult to follow the video instructions. Once your first link is up, the rest become trivial.

We deployed our links with Cambiums cnWave software version 1.2-beta3. This was at the request of Cambium engineers. We normally do not run beta code on the network but as part of our testing agreement, we would run their latest code for this project. So you don’t have to skip to the end, this code branch appears to be very stable. We have not had any software issues.

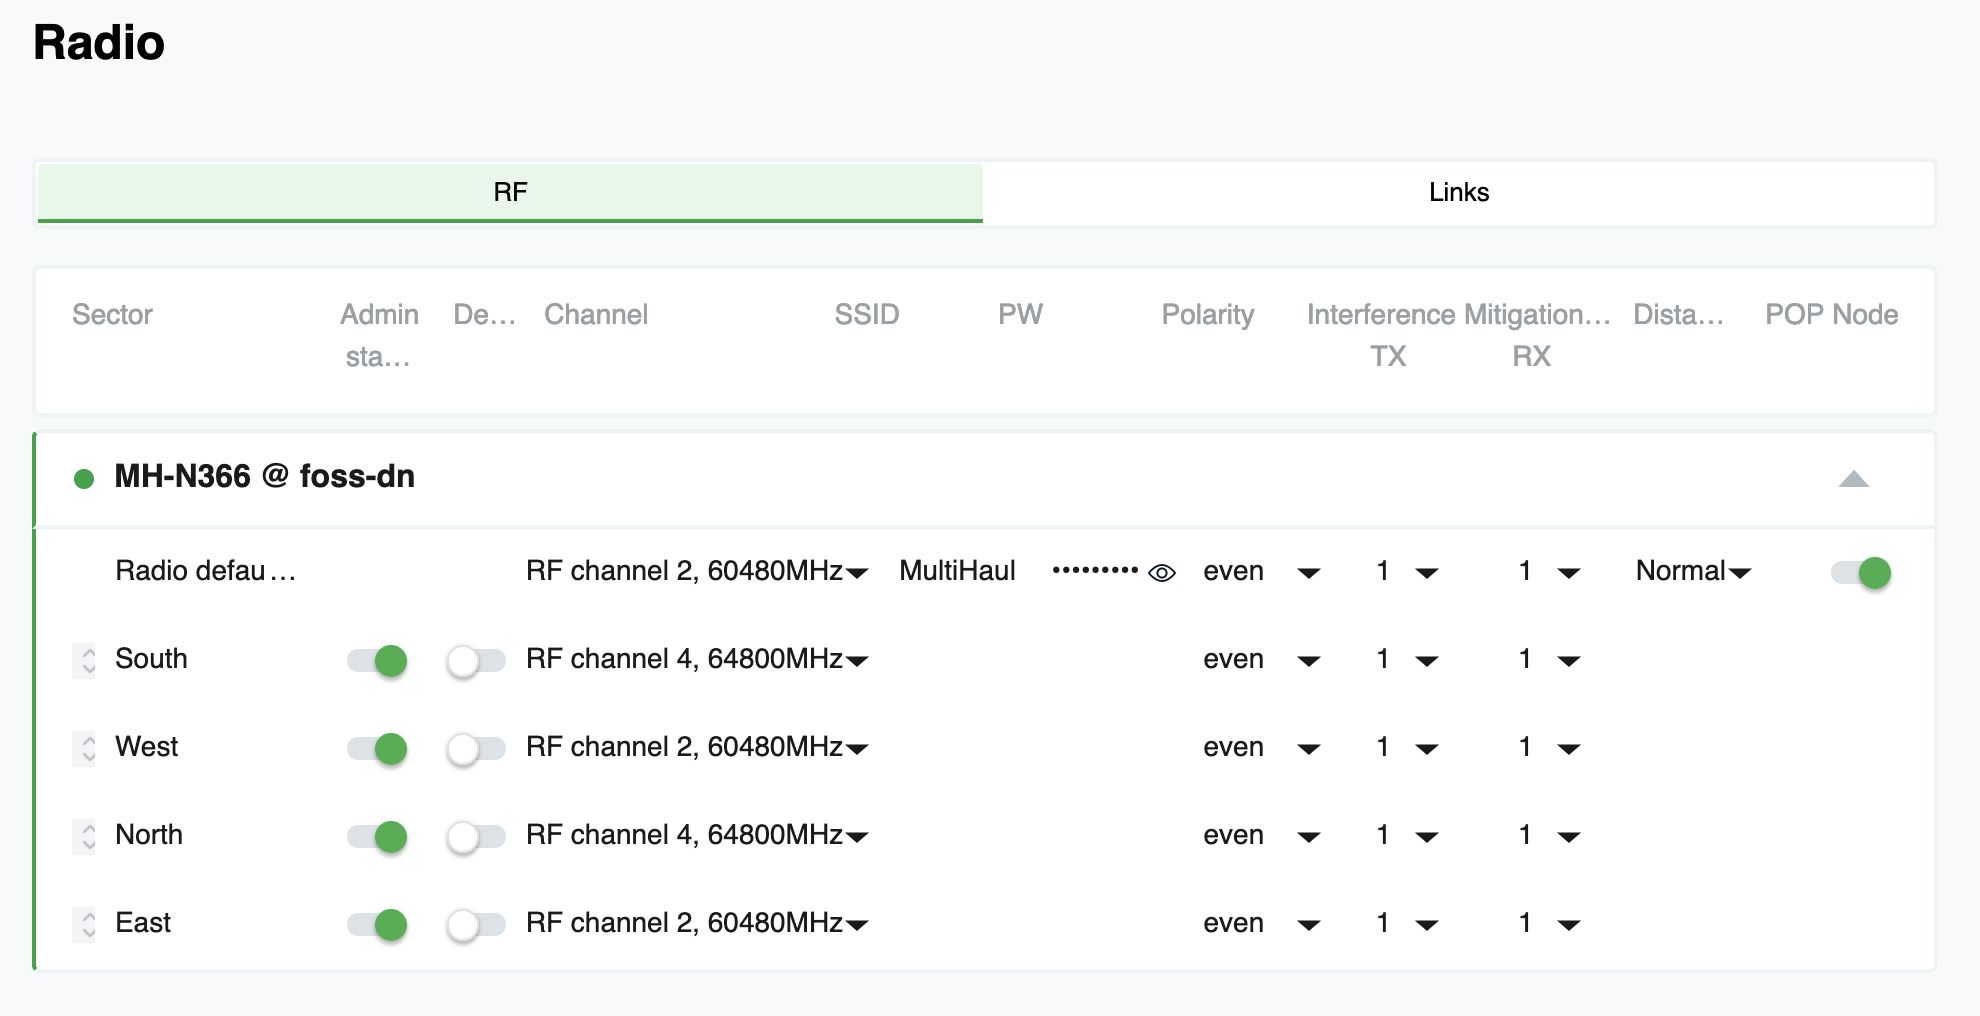
Step 1 is to configure your V5000 distribution node to run as your E2E controller and make it your “POP Node”. This is important in Terragraph world and helps set the network topology.

We then set the channels we were going to use on the two radio sectors as well as the IPv4 information for management. Yes, there is a bunch of IPv6 going on but Cambium has made this automatic. We did not touch any IPv6 settings - we let the E2E controller handle all of that for us. You can get in there and build your own IPv6 networking for this. You can use BGP on your IPv6 network. We opted to keep it simple for this test and since we are running this as a “star” configuration, we did not feel the need to customize this portion of it. We did turn on “Layer 2 bridge” mode which is important for us. This basically creates a layer 2 bridge across the IPv6 network so as far as your devices are concerned, they are on a layer 2 bridge.

Star configuration of the test network with 4 sites operational

Once the V5000 is configured and the E2E controller is running, now you add your client sites. This is where things got pretty cool.

From cnMeastro, you need to do a couple things to get your first link working:

  1. Add a “site” to your configuration. Think of this as your building where the client radio will go.

  2. Add a “node” to that site you just created. A node is your physical radio.

All you need for the site is a location on a map. All you need for the node is the MAC address of the radio you are going to deploy there.

Adding a node to a site in cnMaestro

Now, the final step is to build a “link” from your DN (the V5000) to your node (V3000 in our case). This link is what tells the controller this radio is authorized to connect. When you build a link, this is done in cnMaestro and you only need to tell it the A and Z end of the link. On the A end, you tell it which of the two sectors you are going to connect to on the V5000 and on the Z end, there is only one radio.

Creating a link in cnMaestro

List of existing links for this site

Once the link is built in cnMaestro, all you need to do is deploy the radio. You don’t need to touch it or log into it in advance. You can take a brand new radio out of the box and put it on a roof. As long as that radio MAC address is attached to the “node” in cnMaestro and the link is built, it will work. When the radio starts to beacon, it will see the V5000 and the E2E controller will authorize the radio to connect. Once it is connected, the controller will automatically send the configuration to the new node (IP address, VLANs, etc) and can push new firmware.

We found this process takes about 60 seconds from the time the new radio connects to the V5000 to the time is a fully programmed and able to pass traffic.

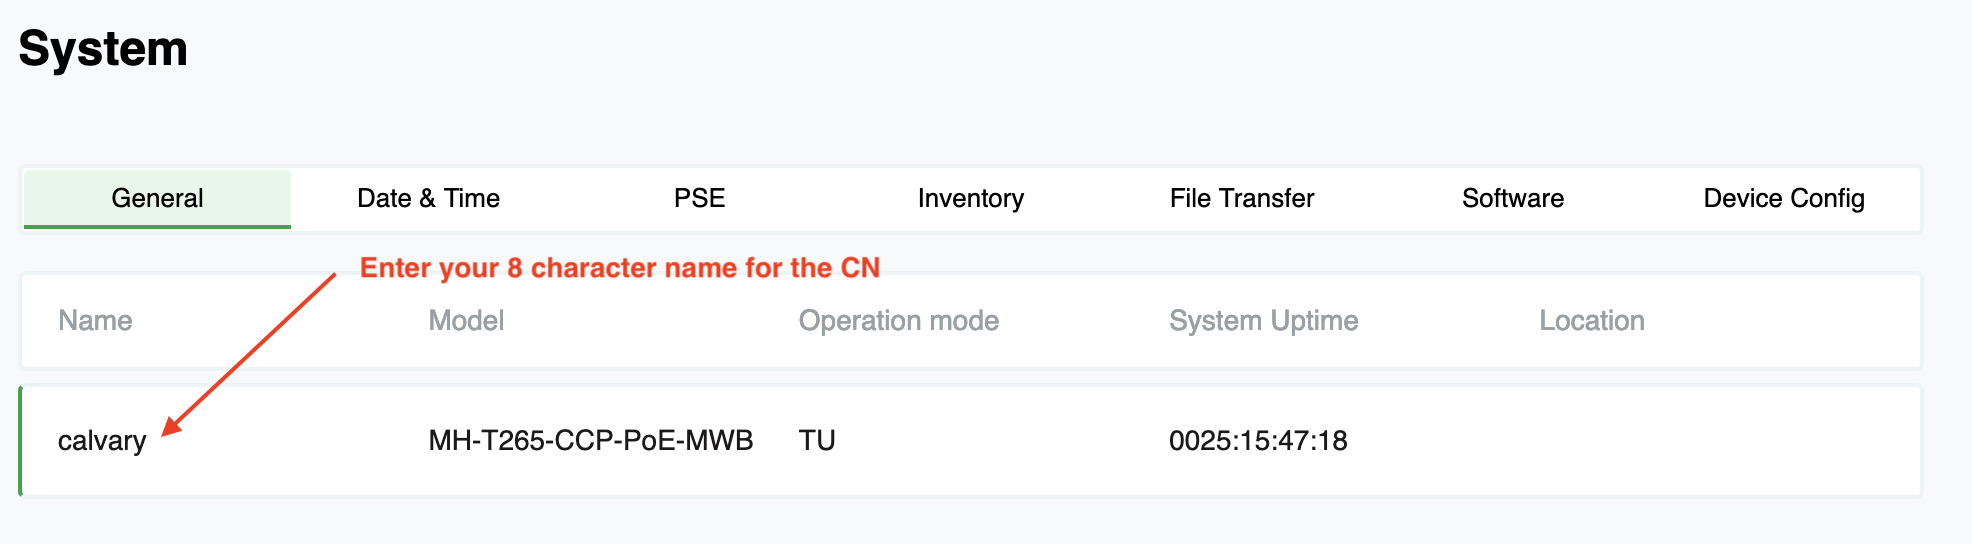
This is the part I really liked with Cambium. I never had to log into the client radio and do anything to it. In Siklu’s configuration, you need to log in and at a minimum, give the client radio a unique 8 character name. That name is what authorizes it to the distribution node. Cambium uses the MAC address for authentication and everything is pushed from the E2E controller to the new client. It allows us to program everything in the office and just hand a new radio to an installer to hang.

The Hardware

A main difference between Siklu and Cambium with the DN is the coverage. Siklu is 360 degrees of coverage with 4 90-degree sector antennas. Cambium is 280 degrees of coverage with 2 140-degree antenna sectors. That leaves ~80 degrees of no coverage on the back side of the DN.

The DN has 2 copper Ethernet ports and a SFP+ port. One of the copper ports is POE in, one has POE out and the SFP+ cage will handle up to 10 Gbps fiber modules. We are powering ours with 48 VDC into a terminal to Ethernet adapter (not POE but just power).

The DN is all metal and appears well built. It is about the size of a shoe box with the ports on the bottom and the mounting hardware on the back.

V5000

We are using the V3000 exclusively for our client ends. They make a V1000 client radio as well that is much smaller. Our clients were all 200+ meters from the DN so we opted to test the high gain antenna (44.5 dBi). Using Cambium LinkPlanner, we could easily hit five 9’s of reliability in our rain zone with this antenna.

A smaller antenna is available for the V3000 as well (40.5 dBi). It is the same exact radio, you just change the antenna that is bolted onto it.

V3000 with a 44.5 dBI antenna on it and a 40.5 dBi antenna on the floor

The precision mounting bracket for the V3000 is decent. It is a little difficult to install on the back of the V3000. The 4 bolts that hold it on are not all accessible with a wrench and you need to use a metric Allen wrench to tighten the bolts. Another tool to carry.

For fine adjustment aiming, it actually works pretty well and does not have much play in it as you tighten it down (a good thing).

You will want to invest in an aiming scope if you are doing any aiming past a couple hundred meters.

V3000 with a scope and Cambium aiming tube both installed

Cambium sells a plastic aiming tube (pictured on the right) that slides into a bracket. It works ok for short links. There is a mount on the left top side of the radio that will accept aiming scope. This scope was dead on in our experience (looking your direction IgniteNet) and made aiming super simple.

Looking through the scope. V5000 is dead center.

Performance

Well, how well does it work? One of the issues we have heard about (and experienced) with Terragraph radios is a loss of overall throughput on a sector when a second client radio is added. This is an area we really wanted to test with Cambium.

Our test set up was a OSX laptop with the speedtest.net client testing back to our own in house speedtest.net server running on a Proxmox box in the same rack as our fiber terminates from the V5000. We tested by plugging the laptop directly into the V3000 client radio’s AUX Ethernet port.

With a single client radio on the V5000 sector, we were easily able to saturate the laptops Ethernet port speed. I don’t have a test configuration that lets me test faster than a gigabit Ethernet port. Sorry. But, since we are handing off with 1 Gbps connections in most cases, this was fine for us.

V3000 test with single radio on V5000 sector

We then added additional client radios to the V5000 and tested at each install. Once the V5000 sector got its second client attached, we did see a drop in overall throughput - mostly on the download side of things. We were no longer able to saturate the Ethernet port on the laptop.

V3000 test as second client on sector

We repeated these tests over and over again. We consistently see between 850 Mbps and 900 Mbps on the download and over 900 Mbps on the upload side.

We are NOT channel bonding on the V5000. This is with a single channel per sector.

We have been very pleased with this performance. We have taken down four 802.11ad radios, eliminated our self interference and are offering faster speeds to our customers with the Cambium hardware.

Latency has also decreased. Here is a client (the large apartment building) ping test before (using Kwikbit PtMP radios) and after on the Cambium Terragraph. This is a test from PRTG pinging a CCR1009 in the apartment building every 30 seconds. You are looking at a 2-day average result graph:

Ping test across wireless link

Would we spend our own money on this hardware moving forward? Without hesitation. It is a solid addition to a growing product line in the 802.11ay space and one we have had very good experience with.

January, 2022 update

As of the first of this year, we have installed a V3000 point to point link at 1,030 meters to test that part of the product portfolio. We are able to push ~ 950 Mbps through this link in our tests. I think we are inhibited by port speed currently. It is not connected to fiber but only the copper port negotiated a 1 Gbps.

In addition, we added a second V5000 and 7 clients to the network. These were a mix of V3000 and V1000 clients.

We have had one significant snow event. We got about 5” of very light cold snow one night. It did impact a couple of our V3000’s. The point to point never went down but RSSI degraded and power increased to full on both ends. We had two client nodes bounce a couple times and one go down for an hour until wind blew the snow off. Upon inspection, most of our V3000 radios were totally covered in snow on the reflector dish. These have been jokingly called a “snow shovel” and they did in fact act like that for this storm. I am afraid of what will happen in one of our wet spring storms when the snow really sticks to things and has a much higher water content.

We also have had a V5000 fail on us and it is still in the support group at Cambium to figure out why. When we ran the software upgrade from 1.2-beta4 to 1.2, the V5000 came back up after the reboot and the sector 1 radio was not working and the V5000 would reboot about every 10 minutes. We tried for about 90 minutes to get it working including software upgrades and downgrades. We finally had to swap out the node with a spare. I will post the findings with Cambium but we have requested an RMA on that unit. It had previously been upgraded a couple times with various firmware without issue.

May, 2022 update

We have been working with Cambium testing some snow covers for these radios. After a couple big snow events, I can tell you the covers work well. We did not lose any links that had snow covers on them in our last two storms. These covers are still being tested and are not the final color or design but I can tell you Cambium is listening and working on a snow solution.

As for the V5000 that failed, Cambium reported there was a firmware issue with that one that caused a very rare event to take place. They say that has been fixed in the current 1.2.1 firmware.

Testing Siklu Terragraph hardware

In July of this year, we were selected to field test Siklu’s entrance into the new 60 GHz 802.11ay standard, also referred to as Facebook Terragraph. This is a multi-point technology that has both the benefits of 60 GHz spectrum speed and GPS synchronization to help with self interference. The Terragraph “magic” allows meshing of nodes (called DNs or distribution nodes). I am not going to go into the details of Terragraph or the technology. There are far smarter people than me out there to better describe it. I am going to describe the hardware and our deployment.

We have been eyeing this technology for a few months now. We have a couple locations in our downtown area where we have enough 802.11ad gear deployed that we are seeing self interference. We have gear deployed from Mikrotik, IgniteNet and Kwikbit in both point to point and point to multi-point configurations. Our experience with 802.11ad multi-point has been less than impressive - with Kwikbit being the best of the bunch. We fully understand the limits of the spectrum. We have a hard stop on installations beyond 200 meters in multi-point. We typically run high gain dishes as clients. We don’t have rain fade issues, we have beam forming issues, firmware issues, interference issues (self and otherwise) and generally poor performance. Your mileage will very and I only speak for our deployments. Our luck in point to point is much better with all vendors. It’s the multi-point that is not great.

We have good fiber and 10G licensed backhauls in our core downtown. From here, we were looking to put up 802.11ay gear to serve as multi-point backhauls to our customers around this core area. These customers are small businesses, condo buildings and apartment buildings. We try to provide at least 700 Mbps service to these properties but prefer 1 Gbps or more.

Siklu Multihaul TG N366n distribution node radio

Siklu Multihaul TG N366n distribution node radio

Our hope was one 360 degree 802.11ay radio could replace 4 to 6 existing 802.11ad radios. This would clean up our spectrum and simplify future deployment. It may also allow for future meshing of additional distributions nodes.

Enter Siklu Multihaul TG N366N distribution node (DN) and the T265 client node (CN). The N366 is a 360 degree radio with four 90 degree sector antennas. Each sector antenna could be on a different channel. The equipment supports channels 1-4 but does not support channel bonding as of the writing of this post. The T265 is a 90 degree client radio with a beam forming antenna.

What we liked about the Siklu product is the 360 degree DN radio. Where we were looking to deploy, we already had clients in all directions. Second, the Siklu product did not rely on IPv6 and also supported layer 2 bridging right out of the box. This was in line with our current deployment method. We also have Siklu products in our portfolio and are familiar with their build quality.

For an in depth video review of the unboxing and build quality, see our review here:

Build quality is in line with Siklu’s other products. Firmware is still early. We are running 1.1.0 and will focus on that version for this review.

After some channel planning, we decided to run with the suggested A-B-A-B channel plan for the 4 sectors. We are using channels 2 and 4 in our configuration. We have seven client sites selected with the furthest site being 180 meters from the DN. All within the specifications of the equipment and the technology.

Take a look at our installation video for both the DN and a client site.

Configuration of the system is pretty straightforward. Out of the box, our hardware was running an early release that did not have a mature web interface. So, we logged in via CLI and issued a command to load new firmware via FTP to the radio and then rebooted.

Once 1.1.0 was loaded, all future configuration can be done via the web interface. Very little configuration needs to be done for the system to work. We started with the DN. We first named the DN with a unique 8 character name (can be less) and then rebooted it. Next, we added our management IPs. Like other Siklu gear, the MultiHaul TN product line can have multiple IPs and VLANs on every interface. This allows us to program it using the default IP and not have to reboot and reconfigure our computer to move IPs.

Next, we assigned radio channels to each of the 4 sector antennas. There is one final step on the DN - entering your links but more on that later.

Screen Shot 2021-09-25 at 4.45.59 PM.png

Next, take a T265 out of the box. Again, due to old firmware, we logged in via CLI and upgraded firmware. Now, log in to the web interface. Only one step is required - give the CN a unique 8 character name. That is the the name that the DN will use to connect and authorize the radio. You can get into changing the SSID, encryption keys, etc but we did not and I would not recommend it. You can give the CN an IP as well but it is not required to connect it.

Screen Shot 2021-09-25 at 4.46.52 PM.png

Once you have the 8 character (or less) unique name of the CN, you now build a link in your DN. It is as simple as adding that unique CN name and telling the DN what sector antenna it should see. You can select 1 to 4 of them so if you are not sure, select the antennas you think it will connect to and then edit this once it connects.

Screen Shot 2021-09-25 at 4.45.35 PM.png

That’s basically it. Repeat this for every CN you want to deploy. Just like other Siklu gear, you can get very granular with IPs, VLANs, access ports, etc. You build bridges, add interfaces, untag VLANs, etc. All very Siklu friendly.

Siklu T265 CN  client node

Siklu T265 CN client node

Performance

What have we seen for throughput and performance with the system? Well, that has been a bit of a mixed bag. Let me start by saying Siklu engineers and support staff have been nothing short of wonderful to work with. They are responding to support emails at 11:00pm on a Saturday night, weekends, you name it. This is also a product early in its life and one where the manufacturers (Siklu, Cambium, IgniteNet) are taking a radio standard built by Facebook and engineering that into their product with their firmware. Not a simple task.

So, with that in mind, we have had some issues. Our first DN would disconnect clients every few days for no reason that we could discover. That DN was replaced with RMA and the new DN has not had those issues with over 2 months of uptime. Potentially a GPS related hardware issue that impacted a a small number of devices.

Second issue we have seen is throughput related and this is currently being blamed on the Terragraph standard itself - but we are told a firmware fix is pending. What we see is if you have a single CN on a sector, you get ~ 1 Gbps of actual TCP throughput. As soon as you add a second radio to that same sector, your throughput is cut by about 50%. It does not matter if that second radio is actually installed. As soon as it is administratively added to the DN as a link and activated, the throughput is cut.

Here is a TCP speed test from a laptop plugged directly into the T265 CN with a speedtest.net test back to our own server on our network. This is using the speedtest.net app, not the web interface. We are not seeing full ~950 Mbps of the laptop port due to some network congestion on this link.

TCP speed test with one CN on that sector

TCP speed test with one CN on that sector

Now, we administratively turn on a second CN to that same sector on the DN and this is the next speed test:

TCP speed test from same CN with a second CN link turned on for the same sector

TCP speed test from same CN with a second CN link turned on for the same sector

We can duplicate this result on every sector with every channel and using speedtest.net tests or TCP bandwidth testing in our Mikrotik routers just going through the link itself. It show very consistent 50% drop in throughput as soon as the 2nd (or third) link is activated in the DN on that sector. Just have one link on a sector? That sector will see full speed performance. Does not matter what the other sectors are doing.

Mikrotik bandwidth test through only Terragraph gear with two links active on that sector. Results show both one way tests and simultaneous.

Mikrotik bandwidth test through only Terragraph gear with two links active on that sector. Results show both one way tests and simultaneous.

If / when this is fixed with a firmware upgrade, I will post that information.

Conclusion

I love the hardware, I love the software and I love the concept of what Terragraph brings. But, from a performance standpoint, we are not there yet. I think that will change and we are leaving this gear up since it fixes our self interference issues, but I look forward to the speed bosts that are promised.

Update November 30, 2021

We have continued to work with Siklu on the speeds and the GPS issues.

On the speeds, firmware 1.1.4 was released and it supports flexible bandwidth control. Running some speed tests with 1.1.4, we are seeing the speed issues improve greatly. We can now just about max out the 1G Ethernet port on our testing laptop running TCP bandwidth tests back to our core test server. I would say the flexible bandwidth is working well.

On the GPS issue, we continue to have DN reboots and CN disconnects up through firmware 1.1.4. Siklu believes we may have faulty hardware on the DN. We have been sent our 4th and 5th DNs for testing. We already have RMAd one, we bought a third as a spare and both the second (RMA replacement) and the third will reboot randomly. Logs are showing it is related to GPS reception. There is a watchdog in the radio that will eventually reboot the DN if it looses GPS sync for a set period of time. We know there are no obstructions blocking GPS signals to this radio. We went so far as to put anti-bird spikes on the top of the radio to keep birds from landing on it and potentially blocking GPS signals. So, they sent us two more DNs so we can RMA #2 and #3 and send them in for support investigation.

However, we have been working on this test since July. We have yet to go more than a week without some piece of hardware rebooting. With snow coming, we are discussing what our next steps will be. Some of these radios will not be physically accessible once there is snow on roofs. We need to decide if we are going to leave these radios up through the winter…

I know at least one other operator with many more radios up than we have and they are not seeing issues like ours. We might just be in a weird spot for this test where some sort of RF issue is impacting these. I can’t explain why we have ongoing troubles and others do not. Siklu engineers are at least publicly baffled as well. I don’t think there is a system wide issue with Siklu Terragraph but we have not had a great experiment at our test location.

January 4, 2022 update

At the end of 2021, we made the decision to remove the Siklu Terragraph equipment from our network. We continued to have issues with both DNs and CNs rebooting on us. Siklu was incredibly responsive to this issue and event sent people onsite to troubleshoot. In the end, we needed to stabilize this part of our network and move on to other projects. We initially thought this test would be a month or so and we would move on. Six months later, we were still climbing on roofs and replacing hardware to try to narrow down what was going on. As a small shop, we had to move on and divert our resources to new projects. We continue to be very happy with our EtherHaul and MultiHaul systems we have in production but we just could'’t get the bugs worked out of the Terragraph at this location. I know other operators that have not had a single issue like ours.

Au Wireless appears on The Brothers WISP podcast

If you are in the wireless Internet service provider (WISP) business, you should know about The Brothers WISP. This is a weekly podcast with industry leaders that discuss the WISP business, hardware, software, trends, etc.

This week, I was asked to participate in the panel with Simon Westlake, the CEO of Sonar Software, one of the leading software platforms for ISPs (and the software Au Wireless uses).

Managed WiFi in the MDU

We operate in an apartment building with over 50 units we provide service to. Initially, we thought the best plan of action was to put an Ethernet network jack in every unit, cable that back to the switch on each floor and let the resident choose their own router. We set up DHCP Option 82 to manage IPs and billing. On our end, this was dead simple. On the resident end, it was less than desirable.

What we ended up with was an unusually large support call volume for “slow Internet”. When a network jack was tested via Ethernet, speeds were over 900 Mbps upload and download. But, on WiFi, most residents were seeing under 10 Mbps. The problem? massive WiFi interference from all those customer routers.

WiFi scan from the courtyard

WiFi scan from the courtyard

It was impossible to even read individual SSIDs in our WiFi scan. But, look at all that dead 5 GHz space in the DFS channels! An opportunity to fix this problem was waiting…

We decided the solution was to go with managed WiFi so we could control the airwaves and mitigate this problem. Now, we had to decide which way to go. We looked at a handful of options:

  • Mikrotik hAP AC in every unit with a separate SSID for each unit. We control the channels and power.

  • UniFi solution with an AP in each unit and same SSID for the building. No way for a resident to plug in any devices like an X Box and single password for everyone (ie: flat network).

  • Same as above but with dedicated SSID to each unit on separate VLAN.

  • Real managed solution with Cisco or Ruckus using a single SSID but dPSK security (more on that below).

As we put costs / benefits on paper, Ruckus began to emerge as the leading solution. The reason is two fold.

  1. Virtual Zone Controller can be run on existing Proxmox hardware for less cost

  2. 10,000’s of grey market APs available for dollars an AP

The sheer volume of Ruckus grey market equipment made them a popular choice. We could buy the 60 APs we needed for $20 each and get a modern 802.11 AC AP with 4 LAN ports allowing the resident to still plug in their own devices if they wanted (using the H500).

We took the plunge into managed WiFi and set up the building like this:

  • Mikrotik CCR 1009 router serving over 50 VLANs (one for each unit). Each VLAN has a /24 of private IP space (from the 172.16.x.x/16 block). Each VLAN was SRC-NATd to a separate public IP. This allows us to track take down notices and do our shaping with our Preseem boxes.

  • Mikrotik 24 port POE switch on each floor. Each port powers an AP and sends all VLANs tagged to that AP as well an untagged management VLAN.

  • The untagged management VLAN is using DHCP Option 43 to insert the address of the Ruckus virtual smart zone so a new AP knows how to get to the controller which is off site (see below for example).

  • Controller has a single SSID for the building and then over 50 dPSK passwords. Each unit has a dedicated secure password that when used, puts devices on that unit’s VLAN / subnet. This allows a device to roam to any AP in the entire building and still be on their own private LAN.

  • Each AP has 4 LAN ports and they are all set to be access ports for the VLAN for that unit. This way, you can plug in an X Box and be on the same subnet as your WiFi devices.

  • Sticker on each AP gives the resident the building SSID, their unique password and our support number.

  • APs set up to only use 20 MHz channels in the DFS range. 2.4 GHz radios are shut off in many of the units to cut down on noise but still allow coverage.

Now, we can take a factory reset (or brand new) AP out of the box, plug it into the Ethernet jack in each unit and that AP will power up, get the controller information from Option 43, get correct firmware from the controller and receive the configuration for that building all automatically, We only need to log into the controller and set the LAN port access VLANs to untag the correct unit’s VLAN. But that is a one time setting.

This now allows us full control of the RF environment and we can see into the network to troubleshoot resident connections. The residents have over 50 APs their devices can connect to all with the same password dedicated to them. VLANs can not see other VLANs for security. Each VLAN has its own public IP address and we can traffic shape each public IP separately using our Preseem boxes.

For setting up a Mikrotik with DHSP Option 43:

  • Go to this site to get hex value of controller IP: https://shimi.net/services/opt43/

  • E.g. 10.254.254.101 option 43 hex 060e31302e3235342e3235342e313031

  • On Mikrotik go to DHCP Server – Options – add

  • Need to add 0x in front of hex value to let Mikrotik know it is hex

  • Name ‘Ruckus-controller’, code 43, value 0x060e31302e3235342e3235342e313031

  • Go to DHCP Server Network and assign the option just created

For setting up Ruckus virtual Smart Zone (vSZ) on Proxmox:

There are a couple things to note on this. For those familiar with Proxmox, you probably have this workflow down. We were not there yet and ended up re-doing it a couple times.

One big catch… If you are using end of life APs, like we are (the H500’s), you need to figure out what the latest version works for them (in our case, 3.6.2) and build the vSZ with that version first. You can upgrade but you can not downgrade vSZ versions.

Once we build the vSZ with 3.6.2, you can then have up to three consecutive versions of the software on the vSZ. For us, those three versions would be (in order):

  • 3.6.2

  • 5.0.0

  • 5.1

No one wants to run a 5.0.0 of anything so we skipped 5.0.0 and have 3.6.2 and 5.1 running on the vSZ. This means, when we create a “zone” on there for APs (ie: a building), we can decide which version the zone gets. If we plan on using old EOL hardware, we choose 3.6.2. If it is new hardware that is still active, we choose 5.1. We can’t go any further with versions on this hardware if we want to continue to support the H500s we have deployed.

Here is a step by step document for getting the vSZ up and running on Proxmox.

615 Water St - welcome to the network!

Our newest on-net building is operational at 615 Water St. This is the newly renovated The Gold Apartments. Renovations are complete, the building looks fantastic and we are providing services from 25 Mbps up to gigabit speeds in all units via a dedicated Ethernet connection.

If you are looking for an affordable place to live in Golden, check these guys out: https://www.castellpropertyservices.com/vacancies/

Build out status - summer 2019

As of June 1, we are suspending the creation of additional tower sites in the city limits of Golden - with very few exceptions. This is being done for two reasons:

  1. The City is currently exploring municipal broadband (ie fiber). It is difficult for us to invest $10,000's into new tower sites when they have a potentially short lifespan.

  2. We are hitting technological limitations on the frequencies our radios use to service single family homes. We use the same WiFi channels that you use inside your house for us to service you. This is currently the only available frequency space available in the US to use at these distances. It is getting very crowded and full of noise due to the sheer number of devices that are competing for airtime both in your homes and outside. You are likely noticing this with your current Internet provider when you use WiFi and we are experiencing it trying to service you.

That being said, for the past year, we have been using brand new technology (5G technology) in the downtown area to service condo, apartment and businesses along Washington Ave and surrounding streets. This is working very well and we are able to provide near gigabit speeds to those properties. Our growth in the foreseeable future will be using this new technology. The downside of this new tech is we can only go about 500 meters from the tower before the signal fades. Our normal towers are typically much further than that (up to 3 miles) from your house so we can't simply start upgrading our current towers and service you.

We do add new customers as we loose existing customers off tower sites. However, our "churn" rate is lower than 1%. That means people tend to only leave us when they move away. We are extremely proud of this. That is an unprecedentedly low churn rate for our industry and we take great pride in our network and customer service. However, it is not great news for those that are trying to get service from us.

I wish this was a problem we could solve with money or people but the two reasons listed above are not able to be overcome easily. Even if the city decided not to do municipal broadband (which it may not), we would still not be building new towers due to the second reason. Radio vendors are working on new technologies to service single family homes reliably using frequencies outside of the WiFi band but we are not there yet and probably won't be for at least a year.

Three new "on-net" buildings

8th.jpg

This spring, we have added three new buildings to our "on-net" portfolio. These are buildings that are supplied by at least 500 Mbps dedicated bandwidth and in most cases, 1 Gbps links.

1211 Avery St is a multi-unit commercial building that also services our Avery tower site. Units in this building have access to our dedicated 500 Mbps microwave link.

The condo building located at the corner of 19th St and Ford is now on-network. This building is being upgraded to a gigabit dedicated wireless link by Q1 2019. 

The two 6 unit condo buildings on 8th St between Washington and Cheyenne are serviced with a dedicated 1 Gbps link.

For service in any of these buildings, visit our sign-up form!

avery.jpg

Our equipment - update #4 for 2018

Looks like it has been around 18 months since we last updated our equipment information and there have been a couple significant changes.

We changed our upstream ISP about 12 months ago. We used to buy fiber and Internet access from Comcast. While this worked fine, we started looking for more of a strategic partner for our bandwidth. We found another WISP in Colorado that was expanding their business connection footprint into Golden and after some discussions, we realized it made sense to buy bandwidth from them. They took over our Comcast contract to the Mountaineering Center downtown and then they added a 10G fiber link to our tower on Lookout mountain. This gave us access to significantly more bandwidth at cheaper pricing than Comcast. It also gave us redundancy between the two locations.

With this change, we had to move away from the Peplink core router. It was time to finish learning the Mikrotik and switch back to them. We started off with a CCR1009 at both the Mountaineering Center and the Lookout Mountain tower. These were connected via 1G fiber to our ISPs routers in each location (also Mikrotiks).

IMG_20171104_091020.jpg

We also removed our AirFiber 24 link from the Mountaineering Center to Lookout and replaced it with a Siklu 1 Gbps link operating in the 70 GHz band. This Siklu link has two Ethernet ports on it. We use one to route our management VLAN between locations. Our ISP uses the other to build a redundant link for both of our networks incase of a fiber failure at either location. Our ISP took care of BGP routing of our public IP space - one less thing for us to worry about and it makes sense since they own the public range we use.

We recently upgraded both of our edge routers to Mikrotik CCR1016-12S-1S+ routers. We did this to remove a single point of failure at each location - the edge switch - and move all of our connections to fiber. Now, each CCR1016-12S-1S+ is connected to 2 or 3 Netonix switches that in turn hit all our radios. These Netonix all are home run wired back to the CCR1016-12S-1S+ via redundant fiber (using RSTP). If we loose a switch now, we only loose the radios attached to it. In the past, we had one main switch that fed other switches via copper. If we lost our main switch, we lost everything. As we keep adding radios and backhaul links, I needed to increase throughput to each switch, remove single points of failure, and get away from RF interference the longer Ethernet runs were experiencing on our towers. Plus, I like being electrically separated from switch to router on our towers by using glass.

Now that we have Mikrotik routers in both edge locations, we have our ISP routing around fiber failures via BGP and we are routing around failures of their hardware using simple internal route rules in the Mikrotiks.  In other words, if there is a fiber cut out in the wild, our ISP will self heal to the other fiber line via their link on the Siklu.  If our ISP has their own router failure or the connection between us and them fails at either location, we will self heal over our side of the Siklu link. The two fiber paths (Mountaineering Center and the Lookout tower) each take separate physical paths back to the main connection in an Internet hotel in downtown Denver.

So, while we are not 100% immune from problems, we are well protected from a large percentage of potential issues.

IMG_20180415_133906.jpg

We were able to re-use the AirFiber 24 radios to become a point to point to a large condo building in Golden. From this building, we placed an IgniteNet 10G Omni (60 GHz radio) to supply 2 Gbps connections to a number of other condo buildings in the area - allowing us to grow our "on network" building footprint and offer speeds well in excess of 100 Mbps in each of these buildings. Many can now support eventual gigabit speeds with no additional hardware upgrades. We just need to buy more bandwidth...

In each of our "on network" buildings, we place another Mikrotik router (various models) to provide both private and public IP routing to the customers in each building. This allows us to bandwidth shape at each building as well.

Let's talk about network management now... That was also a big change in 2017. The network finally outgrew QuickBooks and manual management. Both from a simple invoicing and money collection standpoint to an automated work flow point. We contracted with Sonar and now use them for 100% of our customer management, billing, traffic shaping, sales, installation, etc. A perspective member signs up on our website via a form that links to TowerCoverage.com  That form pre-qualifies the person and then dumps all their information into Sonar for us. We then schedule roof visits and installs via Sonar and kick the work orders out to our installers automatically. Once installed, we activate the customer in Sonar, it assigns them an IP address and then programs the correct router and places them into the correct speed package and builds the interface queue. It bills them and allows them to pay online. If a customer is delinquent, it will automatically slow their connection to 1 Mbps and allow access only to our billing portal. The moment they pay, it automatically releases that restriction and they are back online. Everything is automated! Took a bunch of "busy work" from the admin.

IMG_20180215_115614.jpg

We have added a couple more licensed point to point links as well as a handful of unlicensed 60 GHz links capable of 2 Gbps of throughput. We are removing as much 5 GHz point to point as possible.

2018 has brought a few new buildings on-line as well as expansion into two additional neighborhoods we did not service before.

No Point to Multi-point equipment changes are on the horizon. We continue to be very happy with the Cambium ePMP gear and look forward to the ePMP 3000 line coming out this year.